The pan is already too hot when you remember the grilled cheese. The butter smokes, the bread goes from pale to scorched in under a minute, and the cheese inside is… still stubbornly cold. You flip, press, pray, then bite into something that tastes mostly of disappointment and burned crust.
Five minutes later, you’re staring at a greasy plate and wondering how a sandwich with three ingredients can go this wrong.
Somewhere, on TikTok or in a glossy cookbook, grilled cheese has become a “project”. Fancy sourdough, five-cheese blends, truffle oil. Yet the basic problem remains: how do you get that deep golden crunch outside and that slow, stretchy melt inside, without timing it perfectly to the second?
Old-school cooks had a quiet answer to that question.
A small, almost forgotten move.
The tiny step our grandparents used, then we stopped
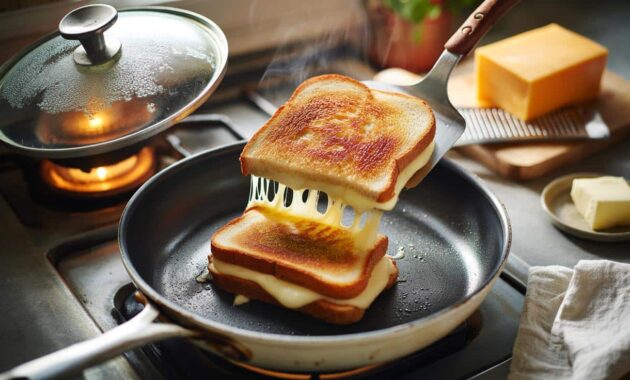
Watch someone who really knows grilled cheese and you’ll notice something odd. They don’t start with a screaming-hot pan. They start with… a lid. Or a second pan. Or even a metal bowl turned upside down like a tiny UFO over the sandwich.
The forgotten technique isn’t a secret ingredient. It’s controlled trapping of heat. Gentle, steady, slightly steamy heat that lets the cheese melt at the same pace the bread browns.
The outside still fries in fat. The inside basically takes a warm bath in trapped air.
It’s closer to a mini-oven than a simple fry-up.
Picture a cramped student kitchen, one electric burner working, the other flickering like a dying star. A friend of mine, Ana, used to feed a rotating crowd with nothing but bread, supermarket cheddar and a battered non-stick pan. Her trick? She always grabbed the dented lid from the pasta pot.
She’d lay the sandwich in a modestly warm pan, add a knob of butter, then cover it. Two minutes later, she’d lift the lid: soft hiss, swirl of steam, bread already turning evenly golden, cheese visibly starting to slump. Flip, cover again. Nobody left the table hungry.
➡️ Winter sales at Boulanger: our pick of the best deals you can grab right now
➡️ From perovskite to fusion: the energy breakthroughs finally leaving the lab in 2026
➡️ Spain entry rules from 12 October: will you be stopped at the border? 5 checks Brits must pass
➡️ “I misunderstood my fixed expenses for years”
➡️ An AI-run company: what the results quietly reveal about our future at work
She learned it from her grandfather, who grew up in a village with wood stoves and no broilers. “You don’t fight the fire,” he told her. “You slow it down and trap it.”
What’s going on is basic physics dressed up as comfort food. Plain pan-frying cooks from one side, fast. That’s why your bread burns while the cheese is still solid. When you cover the pan, you trap hot air and a little moisture. Suddenly, the whole sandwich is being warmed from all directions, not just burned from the bottom.
The bread still needs direct contact with the pan to get that crisp, nutty crust. The lid simply stretches the timeline, matching the melt of the cheese to the browning of the bread.
This is why diner grilled cheese, cooked on big flat tops under metal domes, has that deep, even gold: they’re basically steaming and frying at once.
The forgotten method, step by step (and why it changes everything)
Here’s the move that quietly fixes 90% of sad grilled cheese.
Start with medium-low heat, not high. Add a thin layer of butter or mayo to the outside of the bread. Lay your sandwich in a preheated pan that feels warm, not raging. Now the key: cover it with a lid, a second pan turned upside down, or a metal bowl. Anything that creates a little dome.
Let it sit like that for 2–3 minutes. Don’t poke it. You’ll hear a gentle sizzle, not an angry crackle. Lift the cover, peek: the underside should be turning amber, the cheese loosening. Flip, add a tiny bit more fat if the pan looks dry, cover again. Another 2–3 minutes. You’re aiming for slow, even color.
Not a race.
Most people fail at grilled cheese for the same human reasons we ruin a lot of small joys. We’re hungry, we’re in a rush, the phone buzzes, the pan goes on high. Then we chase the burn, turning the heat up and down like a DJ on a bad night.
The covered-pan method forgives that. It gives you a buffer. Lower heat plus trapped warmth means the cheese gets time to relax and flow before the bread tips over into bitter brown.
The biggest mistake isn’t the bread or the cheese. It’s impatience. Another classic error: pushing down hard with a spatula. That forces the fat out, flattens the air pockets and turns your sandwich into a greasy tile. Let it sit, flip once or twice, and trust the dome. *The sandwich doesn’t need you hovering; it needs you to set it up right and walk away for a minute.*
“Every grilled cheese I made at the diner, I cooked under a dome,” a retired short-order cook in New Jersey told me. “People remember the cheese pull. What makes that possible is the steam you don’t see.”
- Start lower than you think
Medium-low heat gives you that gentle sizzle, not a harsh sear, so the crust and cheese evolve together. - Use a lid, any lid
A pot lid, a metal bowl, even heavy-duty foil tented loosely – the point is trapping warm air above the sandwich. - Butter outside, not inside
Fat belongs on the exterior bread, creating a crisp shell while the inside stays all about the cheese. - Flip only two or three times
Constant flipping sheds heat and breaks the crust; calm, timed flips build color and crunch. - Rest for one minute
Let the sandwich sit off the heat; the carryover warmth evens out the melt and saves your tongue from a lava burn.
Why this small ritual sticks with you long after the crumbs are gone
Once you start covering your grilled cheese, something odd happens in your kitchen. You slow down, just enough to notice the sounds again. The gentle hiss of butter, the faint crackle when you lift the lid, the way the scent suddenly shifts from raw dairy to toasted, almost caramel.
You also start to realize how much of cooking is less about exact recipes and more about tiny physical tricks we quietly dropped along the way. Someone opted for a faster setting on the stove, a shorter lunch break, a “hack” that skipped the patient part, and a whole small technique just… slipped out of common memory.
The covered-pan method won’t change your life. But it might change one ordinary Tuesday night at 11:47 p.m., when you’re tired and hungry and need something simple that actually works, every single time.
Let’s be honest: nobody really weighs cheese slices or times their sandwiches with a stopwatch.
What we remember is that one perfect bite, that crunch-then-melt that feels a little like being taken care of. If this forgotten move brings you even a bit closer to that, it’s probably worth sharing with the next person who burns their bread and wonders what they did wrong.
| Key point | Detail | Value for the reader |
|---|---|---|
| Use a lid or dome | Trap gentle heat above the sandwich while the bottom fries | More reliable melt and golden crust, even on rushed days |
| Cook on medium-low | Longer contact time without burning the bread | Deeper flavor, less stress, fewer “burnt outside, cold inside” results |
| Minimal flipping and pressure | Flip 1–3 times, don’t press hard with the spatula | Better texture, intact cheese pull, less greasy, squashed bread |
FAQ:
- Question 1Can I use this covered method with a non-stick pan?
- Answer 1Yes. A non-stick pan works well with lower heat and a lid. Just use a bit of butter or mayo on the bread for flavor and color, and avoid metal utensils on the coating.
- Question 2Doesn’t covering the pan make the bread go soggy?
- Answer 2Not if your heat is moderate and you give it enough time. The bread crisps where it touches the pan, while the light steam mainly helps the cheese melt. If it’s coming out soggy, your heat is probably too low or you’re using very wet cheese.
- Question 3What’s the best cheese for this technique?
- Answer 3Any good melter works: American, cheddar, gouda, Gruyère, mozzarella. For a classic stretch and flavor, combine a sharper cheese (cheddar) with an easy-melter (American or mozzarella).
- Question 4Is butter better than mayonnaise on the outside?
- Answer 4Butter gives a richer, more traditional flavor, while mayo browns very evenly and is easier to spread. Many home cooks use butter for taste and keep mayo as a backup when butter is too cold.
- Question 5How do I stop cheese from leaking out the sides?
- Answer 5Leave a small “border” of bread around the edges when layering the cheese, don’t overfill, and avoid pressing down hard. The gentle covered heat encourages the cheese to melt inward, not gush out.
Originally posted 2026-03-09 05:04:00.