You notice it one morning, usually when you’re already a bit late. The tiles are fine, the bathroom is clean enough, but the grout lines? Grey, stained, slightly yellow, like they’ve absorbed every shower and spilled product from the last five years. You stare at those lines and think, “This used to be white, didn’t it?” Then you turn away, because scrubbing grout sounds like a Sunday you don’t want to live through.
And yet, there’s this weird satisfaction in imagining those lines bright and crisp again.
All it takes is three ingredients sitting quietly in most kitchens.
The moment you realize your grout is silently ruining the room
Grout ages in slow motion, so slow you almost don’t notice. One day your bathroom feels bright, the next it looks a bit tired and you can’t quite explain why. Then your eye lands on those dark seams between the tiles and you finally see it.
The truth is, even when the floor is freshly washed, dirty grout sends a completely different message. It whispers “old”, “neglected”, “sticky under bare feet”.
You start wondering if guests notice it too.
A reader recently told me about her kitchen floor. She’d mopped it the same way for years, thinking the beige grout was its natural color. One afternoon, she moved a cabinet and spotted a thin line of grout the original shade: almost white. Cue mini shock.
She went down an online rabbit hole of steam cleaners and professional services before stumbling on a simple, almost suspiciously basic recipe: three DIY ingredients, 15 minutes, done.
The “before and after” photo she sent later looked like she’d retiled the entire kitchen.
Grout is porous. It soaks up water, soap scum, cooking splashes, skin oils, even tiny bits of dust that mop water pushes into the gaps. Over time, those lines become sponges of daily life. Traditional mopping just moves the dirt around and pushes it deeper.
That’s why at some point, your floor stops responding to surface cleaning. What used to be bright now looks permanently dulled.
*The grout is where the room quietly keeps its secrets.*
The 3-ingredient mix that wakes up old grout in 15 minutes
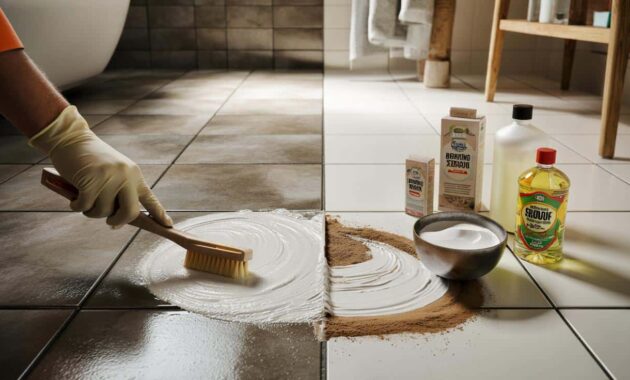
Here’s the simple mix that keeps circulating in cleaning circles. In a bowl, combine: baking soda, white vinegar, and a small dash of dish soap. No exact laboratory measurements needed. Think two big spoonfuls of baking soda, a splash of vinegar to make a thick paste, then a teaspoon of dish soap to help cut through grease.
The mixture will fizz a little at first, then settle into a creamy texture. That fizz is what starts loosening the grime packed deep into the grout.
Apply the paste with an old toothbrush or a small scrub brush, pressing it gently into the lines.
Spread the mix over a section you can manage in one go — a shower wall, the area around the sink, the patch of floor you see first when you walk in. Let it sit for about 10–15 minutes. This break is not just waiting time, it’s working time. The baking soda acts like a mild abrasive, the vinegar breaks down mineral build-up, and the dish soap lifts oils and soap scum.
Then comes the oddly satisfying part. You scrub lightly, and the paste darkens as it picks up the ingrained dirt. You wipe with a damp cloth or mop and suddenly, the grout lines look like they’ve been digitally brightened.
The science behind it is simple but effective. Baking soda has a gentle grit, so it scours without scratching most tiles. Vinegar is acidic, so it dissolves limescale and old deposits trapped in the pores. Dish soap is a degreaser, loosening body oils and cooking residues that cling stubbornly to surfaces. Combined, they attack the three main enemies of grout: mineral build-up, grease, and ground-in dirt.
Let’s be honest: nobody really does this every single day.
That’s exactly why a targeted, 15-minute “reset” session can visually rewind several years of slow, silent build-up.
How to use this mix without wrecking your tiles (or your patience)
Start small. Choose a discreet corner and test the mix on a few grout lines first, especially if your tiles are natural stone like marble or travertine, which don’t love acids. If they pass the test, work section by section. Spread the paste directly into the grout, not over the whole tile surface.
Use a gentle circular motion with the brush, almost more like massaging than scrubbing. The goal isn’t to attack the floor, it’s to let the product do most of the work.
Then rinse generously with warm water so no residue remains to attract new dirt.
People often go wrong in two ways: either they scrub like they’re trying to erase the floor from existence, or they rinse poorly and leave a film that dries dull and sticky. Both end up making the tiles look worse a week later.
Another common trap is mixing every “miracle” product you have under the sink, from bleach to toilet gel, into some sort of toxic potion. Don’t. Besides being unsafe, it can discolor grout permanently.
If your grout is very old or crumbly, be gentle and avoid metal brushes. You’re cleaning it, not sanding it down.
Sometimes, the biggest change in a room doesn’t come from new furniture or fresh paint, but from quietly restoring what’s already there.
➡️ The clever trick of storing lettuce with a paper towel to keep it crisp longer
➡️ Forget birdfeeders experts say this kitchen staple works better for robins and shocks gardeners
➡️ With a flannel or by hand? Which shower method is really “cleaner”? Dr Kierzek’s verdict
➡️ “I feel overwhelmed by emotional closeness”: psychology explains fear of imbalance
➡️ Meteorologists warn early March signals suggest the Arctic is entering uncharted territory
➡️ Heavy snow expected tonight as authorities urge drivers to stay home
- Use the right tools
Soft toothbrush, small nylon brush, and two cloths: one damp for wiping, one dry for buffing tiles. - Work in zones
Focus on 1–2 m² at a time so the mix doesn’t dry out before you scrub. - Protect your hands
Wear simple gloves, especially if your skin reacts to cleaning products. - Mind your surfaces
Skip vinegar on natural stone. Use only baking soda and a drop of dish soap there. - Finish with clear water
Rinse until the tiles squeak lightly under the cloth. That’s when you know the film is gone.
When grout stops being an eyesore and starts setting the tone
Once you’ve seen your grout come back to life, it’s hard to unsee the difference. The room suddenly looks sharper, cleaner, almost renovated, even though nothing “big” changed. That small network of white or light lines quietly frames every tile, every reflection of light, every step you take barefoot.
You might even catch yourself glancing down more often, just to enjoy the effect. It’s a tiny visual victory in a space you use every single day.
From there, the question shifts. Not “How do I live with this dingy grout?” but “How do I keep this fresh feeling without spending my weekends scrubbing floors?” Some people adopt a quick monthly refresh in the most exposed areas. Others use a grout sealer once the lines are clean, to slow down the stains and keep that bright look longer.
There’s no universal rhythm, only the one that fits your real life instead of your ideal one.
You might even share the tip with a friend who’s secretly annoyed with their bathroom but thinks they need a full renovation to feel better in it. Sometimes all they need is a bowl, three ingredients, 15 minutes, and the quiet satisfaction of seeing old grout drop its tired, grey mask.
And that small change can ripple out into how you see your whole home: not as a constant problem to fix, but as a place that responds to simple, human gestures of care.
| Key point | Detail | Value for the reader |
|---|---|---|
| 3-ingredient recipe | Baking soda + white vinegar + dish soap used as a thick paste on grout | Simple, low-cost solution using products already at home |
| 15-minute action | Let the mix sit, light scrub, then rinse by zones for visible results | Saves time while delivering a “renovated” look to tiles |
| Protection and care | Spot-test, avoid natural stone with vinegar, finish with clear water | Preserves tiles and grout while extending the clean effect |
FAQ:
- Question 1Can I use this mix on colored grout without fading it?
- Answer 1
- On most modern colored grouts, this mix is gentle enough. Test a small hidden area first, let it dry fully, and compare. If the color stays the same and the line just looks cleaner, you’re good to go.
- Question 2Is vinegar safe on all types of tiles?
- Answer 2
- No. Avoid vinegar on natural stone like marble, limestone, or travertine, as acids can dull or etch the surface. On ceramic and porcelain tiles, it’s generally fine when rinsed well.
- Question 3How often should I clean my grout this way?
- Answer 3
- For most homes, every 2–3 months in high-traffic areas is enough. In showers or busy kitchens, you might repeat monthly on small zones rather than doing the entire room at once.
- Question 4Can I replace white vinegar with another product?
- Answer 4
- You can use cleaning vinegar (slightly stronger) diluted with a bit of water. If you can’t stand the smell, lemon juice works, but it’s less economical and still acidic, so treat it the same way.
- Question 5What if the grout stays dark even after cleaning?
- Answer 5
- Deep, permanent stains or very old grout sometimes don’t return to their original shade. In that case, a grout pen or regrouting might be the next step. The good news: your 3-ingredient clean is still the ideal preparation before any repair or recoloring.