Now, a small forest object quietly steals the show.
More and more plant lovers are swapping random jars and cloudy glasses for a simple, almost free hack: a piece of woodland picked up on a walk that turns cuttings into a design feature instead of background clutter.
A woodland find that turns into a plant hack
Any indoor gardener who multiplies their plants knows the scene: mismatched mugs, jam jars and bottles crowding the window, each holding a hopeful little stem. Efficient, yes. Pretty, not really.
The twist comes from seeing that humble pine cone on the forest floor as more than autumn decoration. It is a tiny piece of plant engineering, built to react to moisture, and that natural movement can be hijacked to hold your cuttings upright like a miniature bouquet.
A dry pine cone opens its scales wide; once soaked, it tightens them, gripping anything gently trapped in between.
This simple mechanical reaction, developed by conifers to release and protect their seeds, happens without any electricity, motor or human effort. For the indoor gardener, it behaves like a living clamp.
Why a pine cone works so well as a propagation stand
Each scale on a cone is made from layers of plant tissue that swell at different speeds when wet. That creates a sort of hinge. Dry air means open scales. Moisture means they swing inward.
Slip your cuttings between the scales when the cone is dry and fully open. Then stand the cone in a bowl of water. Within a couple of hours, as the cone absorbs water, the scales pull in and gently trap the stems, keeping them grouped and vertical.
Compared with tumblers or test tubes, a cone-based stand offers several advantages:
- it keeps several cuttings together in a single compact base
- it sits low and stable on a table or sill
- it looks like a decorative object rather than gardening equipment
- it costs almost nothing if you collect the cone yourself
Placed on a shelf, it reads more as a crafted centrepiece than a propagation setup, which suits anyone short on space or allergic to messy corners.
➡️ Goodbye air fryer : new kitchen gadget goes beyond frying with 9 different cooking methods
➡️ Discovered in Spain in 1994, the “Excalibur” sword may have Islamic origins
➡️ Goodbye olive oil : the healthiest and cheapest alternative to replace it
➡️ A first in 100 years: a chinook salmon returns to its native California river
➡️ One in 100 million: fisherman hauls in ultra-rare “cotton candy” lobster
What you need to turn a pine cone into a plant display
The materials list is deliberately simple. Most items are already lying around in homes or gardens.
Basic kit
- one large, clean, fully opened pine cone
- a watertight bowl, cup or saucer deep enough for a shallow pool
- small stones, clay pebbles or shells to weigh the cone down
- a little moss or damp sphagnum (optional, for aesthetics and humidity)
- sharp secateurs or a clean knife
- 4 to 8 stem cuttings, around 15 cm long
Choose cones without mould, insect holes or sticky resin. The wider the cone, the easier it will be to slide in stems without snapping any scales.
Best plants for this method
This technique suits species that root readily in water and have flexible, clearly segmented stems. Some reliable choices include:
- pothos and scindapsus
- philodendron varieties
- monstera adansonii
- tradescantia, often called “wandering dude” or “inch plant”
- string of hearts (Ceropegia woodii)
- peperomia, especially watermelon types
- soft-stemmed herbs such as mint
These plants form roots at their nodes, the slightly swollen points on the stem. Once that section sits in water, new roots often appear within days or weeks, depending on temperature and light.
Step‑by‑step: from forest cone to living centrepiece
1. Clean and prepare the cone
Start by brushing off dried needles, dirt or insects with an old toothbrush or soft paintbrush. Then dunk the cone in water mixed with a splash of white vinegar or diluted household alcohol. This quick bath helps reduce fungal spores.
Let the cone dry fully in a warm, airy spot. As it dries, the scales reopen. This is the moment when it is most cooperative for inserting stems.
2. Take cuttings the right way
While the cone dries, prepare your cuttings. Use a clean, sharp blade to cut just below a node. Aim for 10–15 cm of stem per cutting. Remove leaves from the lower half so no foliage sits in the water later on.
Roots form best from bare nodes under water; leaves submerged in water tend to rot and foul the container.
You can take several cuttings from one long vine, as long as each piece has at least one or two nodes.
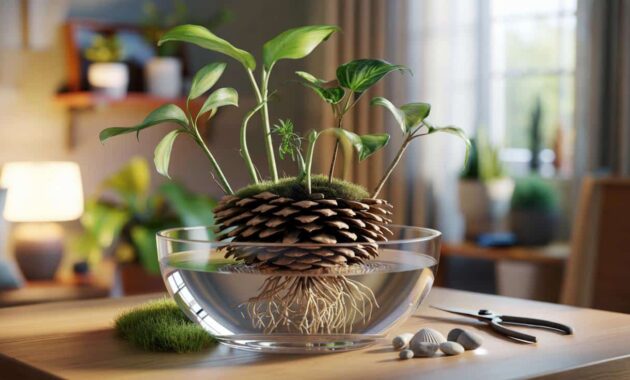
3. Assemble the display
When the cone is wide open again, gently push each stem between two scales. Space them evenly around the cone so it looks balanced from all angles.
Set the loaded cone into your bowl. Add stones or shells around the base to keep it from floating. Pour in water until it reaches the lower part of the stems but does not fully submerge the cone. Only the area around the stem bases needs to sit in water.
Leave the setup for a couple of hours. As the cone soaks, the scales pull inwards and grip the cuttings, holding them upright. At that point, the whole object behaves like a single, sturdy bouquet.
Care and maintenance of your pine cone stand
Place the arrangement in bright, indirect light. Strong midday sun through glass can heat the water and stress the young roots. A north or east-facing window usually works well.
Top up the water whenever the level drops, and change it as soon as it looks cloudy or develops an odour. Fresh water limits bacterial growth and keeps new roots healthy.
Once roots reach a few centimetres long, you can move the cuttings into soil. Use a light potting mix and keep it consistently moist for the first couple of weeks. The plant is moving from a water environment to a soil one, and its young roots need time to adapt.
When shifting water‑rooted plants into compost, think of it as rehab for the roots: gentle conditions, steady moisture, no sudden droughts.
Common questions and small risks to watch
People often worry about the cone rotting. With only the base in water and regular changes, the cone tends to last months. If it begins to soften or darken, let it dry out completely for a few days before using it again.
Another concern is pests. Cones picked up outdoors can harbour tiny insects. A thorough rinse and short soak in diluted vinegar reduce that risk. For anyone sensitive to mould, avoid cones that smell musty even after cleaning.
There is also a small tipping risk if you use a very tall cutting with a tiny cone. In that case, choose a heavier bowl, add more stones or group two cones side by side in the same container for balance.
Beyond aesthetics: why this method appeals to plant people
Propagating plants this way is not just about looks. It changes the feeling of the process. Instead of hiding jars behind curtains, you bring the experiment into the living room and treat it as an evolving object.
Children often respond well to it too. They can see how the cone slowly closes, watch roots form in the clear water and learn basic plant biology without a textbook. For people in small flats, it offers an easy way to build a collection without buying new pots straight away.
| Aspect | Pine cone stand | Standard glass of water |
|---|---|---|
| Stability | Low, wide base, less easy to knock | Tips over more easily |
| Aesthetics | Natural, sculptural object | Looks functional, often mismatched |
| Capacity | Several stems in one compact unit | Often one or two stems per glass |
| Cost | Essentially free if foraged | Requires suitable containers |
Ideas to extend the project further
Once you have mastered one cone, you can build a whole “forest” of propagators at different heights. A taller vase can hide the bowl and stones, leaving just the cone and foliage visible, like a plant emerging straight from water.
For those who enjoy seasonal decor, a winter version might include conifer sprigs and ivy cuttings; in summer, mint and basil cuttings turn the stand into an edible display you can harvest from. Combining this method with grow lights or a simple heat mat speeds up rooting for more demanding species.
Used thoughtfully, that small treasure from the forest becomes more than a craft idea. It acts as a bridge between outdoor walks and indoor gardening, showing how one fallen cone can quietly organise, stabilise and beautify an entire propagation habit.