You only notice it once you turn off the hob. The smell changes, the colour darkens, and suddenly your perfect caramel has turned into a thick, black crust welded to the bottom of the saucepan. The sugar has gone from golden to “call the fire brigade” in about ten seconds. You pour water, it hisses dramatically, and once the steam clears… the pan looks even worse. You scrape with a spoon, you curse quietly, you wonder if you should just throw the whole thing away and pretend it never happened.
The sink fills up with “I’ll deal with it later” dishes.
There’s a tiny, stubborn fear: what if this pan never comes back?
The moment sugar crosses the line
Burnt sugar doesn’t just stick. It clings to metal like it has a grudge. One second it’s glossy and obedient, the next it’s a black lacquer that laughs at your sponge. That’s the brutal thing about sugar: once it passes the right temperature, it doesn’t “slightly overcook”. It jumps straight into disaster territory and takes your saucepan with it.
You stand there, wooden spoon in hand, staring at the bottom of the pan as if it might fix itself if you look long enough. Spoiler: it doesn’t.
Picture this. You’re making caramel for flan on a Sunday evening. You’ve invited friends, dessert is the star, and the sauce is almost there. Then your phone buzzes in the other room. Two quick messages, one voice note, a half-smile at the screen… and when you come back, the sugar is smoking. Not gently. Aggressively.
You yank the pan off the heat, but it’s too late. The kitchen smells like a burnt fairground. Your beautiful stainless-steel saucepan looks like a prop from a post-apocalyptic cooking show.
There’s a reason burnt sugar feels impossible to clean. At high heat, sugar breaks down and carbonises, forming a hard, glassy, almost plastic-like layer. That layer grips onto the tiny scratches and pores in the metal, especially if you’ve stirred with a fork or a rough utensil in the past. Add the shock of sudden cold water and it can even crack into sharp plates, cemented in place.
The good news is that this “cement” still has a weakness. You just need the right kind of attack.
The quick trick that quietly saves your saucepan
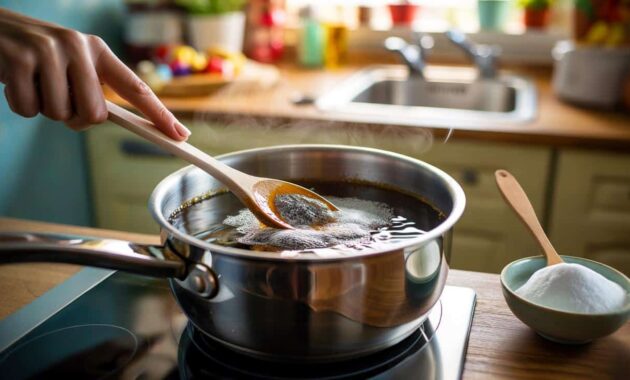
Here’s the fast, low-drama method that actually works: hot water and baking soda, brought back to a gentle boil. Nothing fancy. Nothing expensive. Just a small kitchen chemistry moment.
➡️ Pellets: the little-known trick to save big on your heating before autumn
➡️ Why placing a slice of lemon in the dishwasher can make glasses shine again
➡️ I stopped cleaning everything at once and stayed consistent
➡️ Leclerc: how this Breton shopper cuts 20% off her bill every time she goes to the supermarket
➡️ Easy to make, this classic French sauce transforms even the blandest white fish
➡️ Forget sausages: lentils go even better with this meat
Fill the burnt pan with enough water to cover the black sugar layer by about a finger. Sprinkle in a generous tablespoon of baking soda (two if the situation is dire). Put the pan back on the hob and bring it to a slow boil. Let it simmer 5–10 minutes, nudging the crust occasionally with a wooden spoon. You’ll see the sugar start to lift in soft flakes, like it’s finally letting go.
Most people’s first instinct is brute force. We grab metal scourers, attack the pan under cold water, and scrape like we’re polishing a ship’s hull. That almost always ends the same way: sore hands, scratched pan, and a patch of burnt sugar that still won’t budge. We’ve all been there, that moment when you realise you’ve just spent ten minutes scrubbing for absolutely nothing.
With the boiling water and baking soda trick, the story flips. The heat re-softens the burnt sugar, while the soda slightly changes the pH and helps break the caramelised layer. You go from chiselling at stone to nudging away softened toffee.
There’s a quiet logic to this method. Sugar is highly soluble in water when it’s hot, almost not at all when it’s cold. So soaking a burnt pan in cold water overnight feels comforting, but the sugar clings on. Bring that water back to a simmer and it becomes a dissolving bath. Baking soda adds a light, non-abrasive boost that lifts the carbonised bits without destroying your pan.
Let’s be honest: nobody really deep-cleans their pans every single day. So when burnt sugar happens, the pan is already a little worn, a little scratched, a little vulnerable. That’s why a gentle trick beats a violent scrub.
The line between rescue and pan-ruin
Once the water and baking soda have simmered for a few minutes, turn off the heat and let the pan cool slightly. Then pour out most of the liquid, leaving a shallow layer at the bottom. Take a wooden spoon or a soft spatula and push at the remaining burnt patches. You’ll usually feel them slide off in big, satisfying curls. Rinse, then repeat the simmering step if there’s a really stubborn ring.
Only at the very end, when most of the crust is gone, use a non-scratch sponge with a tiny bit of dish soap for the final polish. The burnt smell disappears too, almost like it never happened.
This is where a lot of people go wrong: they panic and grab the harshest tools in the cupboard. Wire wool, sharp knives, or those rock-hard green scouring pads. They work a little, and they also quietly shred your saucepan’s surface. Enamel chips, non-stick coating peels, stainless steel gets cloudy and rough. The pan may look “cleaner”, but it’s damaged for good.
There’s another small trap: adding vinegar or lemon at the same time as baking soda while heating. The fizz looks satisfying, but it mostly cancels out the cleaning power. Better to keep it simple and let heat and soda do their slow, boring magic.
Sometimes kitchen confidence is just knowing that one reliable trick, the one that turns a “ruined” pan into a minor incident you’ll forget by tomorrow.
- Fill, don’t flood
Cover the burnt layer by about a finger of water so the solution stays strong. - Use enough baking soda
About 1 tablespoon for a medium pan, 2 for a big, badly burnt one. - Go for a gentle simmer
Rolling boils splash and can bake sugar higher up the sides. - Stir from time to time
A slow scrape with a wooden spoon helps the crust detach. - Finish with softness
A soft sponge or cloth protects your pan for the next hundred recipes.
From disaster-pan to quiet little habit
Once you’ve tried this trick once, burnt sugar loses a lot of its power to scare you. You’re still annoyed when the caramel goes too far, of course, but that “I’ve just killed my favourite pan” dread fades. You rinse out the worst of the loose bits, refill with water, toss in baking soda, and put the pan back on the hob while you get on with something else.
*The crisis turns into a background task, almost boring in the best possible way.* Suddenly you’re less afraid to try a darker caramel, a sticky sauce, a new dessert. The pan can take it. And so can you.
| Key point | Detail | Value for the reader |
|---|---|---|
| Use heat, not force | Simmer water and baking soda to re-soften and lift burnt sugar | Protects pans from scratches and saves physical effort |
| Stay gentle with tools | Wooden spoon, soft spatula, non-scratch sponge only | Keeps non-stick, enamel and steel surfaces in good condition |
| Act with simple steps | Rinse, simmer, scrape softly, repeat if needed | Gives a clear, repeatable routine for future kitchen mishaps |
FAQ:
- Can I use this trick on non-stick pans?Yes, as long as you stay on a gentle simmer, avoid metal utensils, and finish with a soft sponge. If the coating is already peeling, no cleaning trick will really fix that.
- What if I don’t have baking soda at home?You can still simmer plain water; heat alone will loosen some of the burnt sugar. It might take a second round and a bit more patient scraping, but it often saves the pan.
- Is vinegar better than baking soda for burnt sugar?Vinegar is great for limescale and mineral deposits, less so for caramelised sugar. For this specific mess, baking soda with hot water usually wins.
- How long can I safely simmer the pan?For most saucepans, 5–15 minutes on a low simmer is fine. If you need longer, let it cool, empty, then repeat rather than boiling hard for half an hour.
- Does this work on other burnt foods too?Yes, the same method often works on burnt milk, jam, and tomato sauces that have welded to the bottom. Thick, carbonised layers respond well to the heat-and-soak approach.